Mastering the Complexities of High-Detail Miniature Painting
The Architecture of a Masterpiece Paint Job
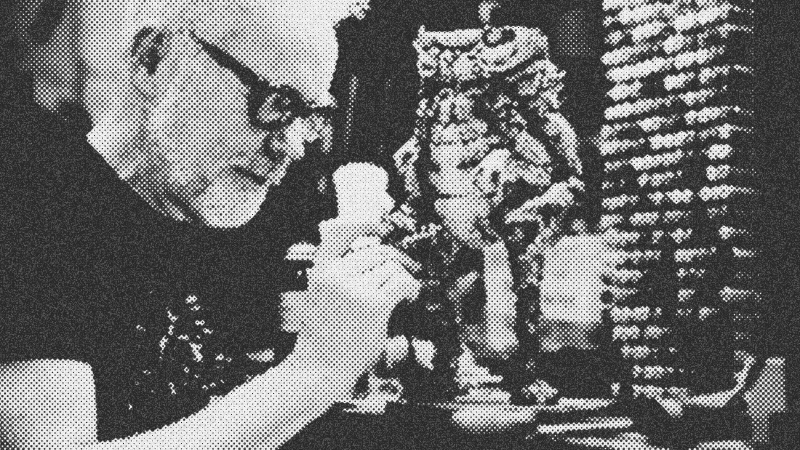
There is nothing like the feeling of standing before a fresh, unpainted resin print. It is a blank canvas of pure potential, but when you are looking at a sculpt as intricate as Herman Pinsky—the crab-like creature designed by Paul Braddock—it can be downright intimidating. This guide is about pushing past that initial hesitation to tackle a complex, multi-layered paint job using advanced techniques like Alcohol Inks and barrier coats.
The goal here isn't just to put color on a model; it's to create an illusion that fools the brain. We want to move away from the look of a "painted toy" and toward something that feels like it possesses biological history. By leveraging the transparency of Copic refills and the precision of an Iwata Airbrush, we can build up a depth of color that mimics the natural variegation found in rare crustaceans, such as the one-in-a-million blue lobster.
Essential Gear and Preparation
Before you fire up the compressor, you need the right tools on your bench. Precision and workflow are your best friends when a project spans multiple days.
- The Model: Herman Pinsky by Paul Braddock. This 3D-printed resin sculpt is optimized for painting, with deep crevices and clear transitions between shell forms.
- Paint Systems: Copic Refill Inks (alcohol-based) for the base and mid-tones; Mission Models and Vallejo acrylics for detailing and washes.
- Application Tools: A dual-action Iwata Airbrush and a selection of fine-tipped brushes.
- Specialized Equipment: A Banding Wheel (pottery wheel) to rotate the model smoothly without touching the wet paint, and a HEPA Filter to manage overspray and fumes.
- Consumables: Isopropyl Alcohol (99%), clear gloss spray, and Tamiya Surface Primer.
Start by giving the model a thorough coat of white primer. Resin can be difficult to read; the primer reveals the topography and any print defects that need cleaning. Once primed, glue the main body components together with small dots of hot glue to ensure the paint transitions seamlessly across joints.
Step 1: Laying the Biological Foundation
The secret to a realistic animal shell is starting with the "dirt." We begin with a very light brown or beige wash. Apply this across the entire model and then use a cloth dampened with Isopropyl Alcohol to pull the paint off the high spots. This leaves the pigment trapped in the deep textures and pits of the 3D print. It immediately creates a relationship between the different parts of the sculpt.
Next, we move to the primary color scheme. For this build, we are aiming for a hybrid blue and orange crustacean look. Start with the orange. Using the airbrush, lay down Copic orange in varied saturations. You want it to look organic, not uniform. Think about where a crab would be most vibrant—often at the tips of spikes and the edges of the carapace.
Step 2: The Power of the Barrier Coat
When working with Alcohol Inks, things can get messy fast because new layers of ink will reactivate and blend with the layers underneath. To prevent your vibrant blues and oranges from turning into a muddy mess, you must use a barrier coat.
Once you are happy with the orange layer, hit the entire model with a clear gloss coat. This seals the orange and allows you to apply the blue on top. If you make a mistake with the blue, you can wipe it away with a Q-tip and Isopropyl Alcohol without damaging the orange underneath. This is the ultimate safety net. It allows you to be bold with your color choices because every step is reversible until you seal it again.
Step 3: Topography and Texture Refinement
With the barrier coat in place, apply the blue ink. Focus on the centers of the shell plates, leaving the orange visible at the edges and spikes. This creates a naturalistic "fade" that looks like it grew that way.
After the blue is dry, use your finger or a Q-tip slightly dampened with alcohol to rub the high points of the texture. Because there is a seal coat underneath, you can "erase" the blue to reveal the orange or white highlights below. This brings out the incredible detail Paul Braddock built into the CAD file. It's not just painting; it's revealing the form.
Step 4: Detailing with Spots and Fleshy Tones
Now we transition from broad strokes to fine details using acrylics. This is where the character truly comes to life.
- Spotting: Real crabs have complex patterns. Apply light blue spots over dark blue areas and dark blue spots over orange areas. Don't use a stencil for everything; hand-painting these dots makes them feel less mechanical.
- Fleshy Bits: Use a fleshy pink acrylic in the joints, under the belly, and around the mouthparts. This suggests a softer, vulnerable organism living inside the hard shell.
- The Wash: Use a Vallejo black wash to flood the crevices. This "pops" the detail by creating artificial shadows, providing the separation needed to make the shell plates look like individual pieces.
Step 5: The Eyes and the Gloss Challenge
The eyes are the most vital part of any character. They are also the most difficult. To avoid the "uncanny valley," you need a perfect, mirror-like gloss. This cannot be rushed.
Glossy surfaces require patience. Apply multiple thin coats of clear gloss over several days, letting each layer dry completely. If you build it up too fast, the paint will craze or stay soft. You want to "creep up" on the finish. For the Herman Pinsky model, we layered nearly ten coats of paint and clear on the eyes to smooth out the resin print lines and achieve that wet, living look.
Troubleshooting and Pro Tips
- The Sunk Cost Fallacy: If a layer looks bad, don't try to "fix" it by adding more paint. Strip it back with alcohol and start that layer over. It is faster than trying to hide a mistake.
- Removing the Shroud: For ultra-fine airbrush work, some pros remove the needle shroud from the front of the airbrush. It gives you better control and prevents paint buildup, but be careful—that needle is fragile.
- Use Reference, but Don't Be a Slave to It: Blue Lobsters are great inspiration, but the model itself will tell you what it needs. If a specific spike looks like it wants to be orange, make it orange.
- Handling the Model: Avoid touching the model with your bare hands during the final stages. Skin oils can ruin the adhesion of the clear coat or dull the gloss of the eyes.
Conclusion: The Magic of the Build
A paint job like this is a marathon, not a sprint. It involves moments of vulnerability where the model looks "ugly" halfway through, but by sticking to the process of layering and sealing, you arrive at a result that feels truly realized.
The satisfaction of seeing Herman Pinsky go from a grey resin print to a vibrant, realistic creature is what DIY tech and hardware are all about. It is about taking a piece of digital art and, through your own industry and effort, bringing it into the physical world as a masterpiece. Now, get out there and start your next ambitious build.
- Herman Pinsky
- 15%· people
- Isopropyl Alcohol
- 11%· products
- Paul Braddock
- 11%· people
- Alcohol Inks
- 7%· products
- Copic
- 7%· companies
- Other topics
- 48%
Adam Savage Attempts His Most Ambitious Paint Job Yet!
WatchAdam Savage’s Tested // 1:09:08

Adam Savage’s Tested is a content platform and community playground for makers and curious minds. On Tested.com, the highly- engaged Tested YouTube channel, and at conventions and events, dynamic makers share ideas and inspire each other to build their obsessions. Led by Adam Savage, the Tested team explores the intersection of science, popular culture, and emerging technology, showing how we are all makers. Adam also takes viewers behind the scenes of films, TV shows, theater, and museums, shining a spotlight on the craftspeople and artists who make the magic we all enjoy. Tested is also: Norman Chan, Joey Fameli, Josh Self, Kristen Lomasney and Thomas Crenshaw.