The Hybrid Build: Engineering a 3D-Printed, Drill-Powered Go-Kart
Designing a High-Stakes Hybrid Frame
Building a functional vehicle from scratch requires a shift in perspective from traditional 3D printing. While most hobbyists focus on aesthetic models or small functional brackets, constructing a go-kart frame demands a deep understanding of structural rigidity. The core challenge lies in balancing the lightweight, versatile nature of 3D-printed plastics with the raw physical stress of a human passenger and high-speed motion.
Instead of attempting a fully printed chassis—which often results in a bulky, heavy design—the most efficient approach uses a hybrid structure. By utilizing 3D-printed connecting joints paired with lightweight aluminum tubing, you create a space-frame that mimics industrial engineering. This method ensures that the strength comes from the metal geometry, while the printed components act as the complex nodes that define the vehicle's unique angles. To achieve professional-grade results, use high-performance materials like PAHT-CF (carbon fiber-reinforced nylon). These filaments offer the thermal stability and impact resistance necessary to keep the frame from warping or snapping under load.
Tools and Materials Needed
To replicate this advanced build, you must move beyond basic household tools. The precision of the assembly depends on the quality of your printing and the accuracy of your measurements.
- 3D Printer: A high-speed, multi-material unit like the Bambu Lab X1-Carbon or Bambu Lab A1.
- Filaments: PAHT-CF for structural joints, TPU for flexible tires and grips, and PLA for non-load-bearing body panels.
- Power Source: A high-torque cordless drill with a 3-speed gearbox.
- Structural Components: 20mm-30mm aluminum tubing, a junior go-kart rear axle, and pillow block bearings.
- Hardware: M4 and M8 bolts, one-way bearing, bicycle disc brakes, and steel keys for drive shaft slots.
Step-by-Step Instructions
1. Geometry and Prototyping
Start by mapping your geometry. If possible, reference an existing go-kart frame to measure the "kingpin" angles of the front spindles. These angles are critical; they ensure that when you turn the steering wheel, the frame tilts slightly to lift the inside rear wheel, compensating for the lack of a differential. Print your first iterations in cheap PLA to verify the fit before committing to expensive carbon fiber filaments.
2. Printing Structural Nodes
Print the frame connectors using high-infill settings (at least 40-50% with 4-6 wall loops). The middle of the frame is the primary weak spot where weight concentrates. Beef up these central nodes and use horizontal bolt-through holes to pin the aluminum tubing securely to the plastic. This prevents the tubes from sliding out of the sockets during vibration.
3. Integrating the Drill Drive
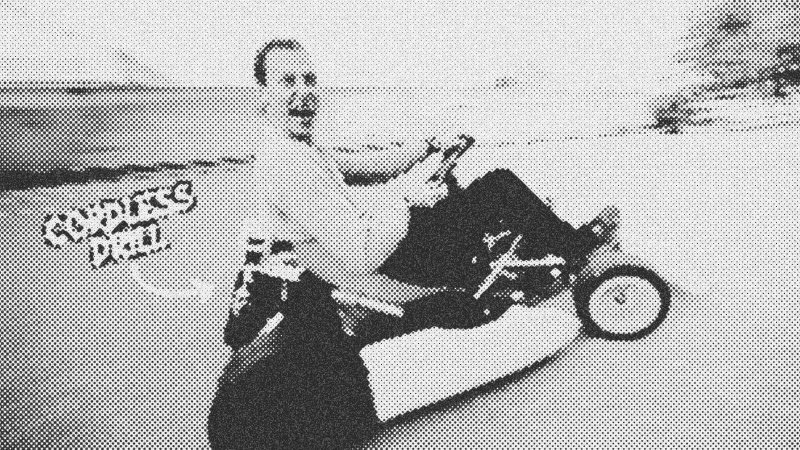
Mounting a cordless drill requires a custom-printed housing that interfaces with the drill’s handle and gear selector. Connect the drill chuck to a bicycle sprocket, which drives a chain to the rear axle. You must install a one-way bearing (sprag clutch) on the drive shaft. Without it, the drill's internal brake will lock the rear wheels the moment you release the throttle, likely throwing you from the vehicle.
4. Fabricating Airless Tires
Traditional pneumatic tires are difficult to seal against 3D-printed rims. A more reliable DIY solution is the multi-material airless tire. Print a rigid PLA or PAHT-CF hub and use TPU for the outer tread. Use "interlocking" slicer settings to chemically and mechanically bond the two materials. A honeycomb infill pattern on the outer TPU layer provides the necessary "squish" to mimic air pressure.
Troubleshooting and Expert Tips
The most common failure point in drill-powered vehicles is the chuck slipping on the drive shaft. Round shafts provide zero grip under high torque. Use a grinder to create flat spots on any shaft that enters the drill chuck. This allows the chuck jaws to bite into the metal, preventing the dreaded "spinning but not winning" scenario.
If the chain frequently jumps off the sprockets, your frame is likely flexing. Add "triangulation" to your design by printing diagonal bracing nodes. In engineering, triangles are the only shape that resists deformation. If your frame looks like a series of rectangles, it will wobble. If it looks like a series of triangles, it will ride like a professional kart.
Reclaiming the Sanctuary of the Workshop
Finishing a project of this magnitude transforms more than just a pile of plastic and metal; it validates the power of resourceful DIY. While this go-kart can reach speeds of nearly 30 km/h, the real victory is the mental bandwidth reclaimed through solving complex mechanical puzzles. By organizing your build process into logical phases—frame, drive, and steering—you turn a daunting "crazy idea" into a functional, sanctuary-like masterpiece of home engineering.
- aluminum tubing
- 14%· products
- PAHT-CF
- 14%· products
- PLA
- 14%· products
- TPU
- 14%· products
- cordless drill
- 10%· products
- Other topics
- 33%
I 3D Printed a Go-kart
WatchAlexandre Chappel // 31:52

I'm an Industrial designer and a maker - I make videos about my projects.