Chappel's 3D printed organizer drops screws for tool-free filament assembly
The shift toward zero-hardware fabrication
Modern organizing often feels like a hostage situation between you and the local hardware store. Most DIY projects require a laundry list of specialized fasteners—M3 screws, wood glue, or specific metal slides—that stall progress the moment a single nut goes missing. The Modular Organizer Cabinet challenges this dependency. By engineering every component to be 3D printed, this project removes the friction of external materials. You don't need a toolbox; you need a spool of filament and patience for the print bed.
This isn't just about convenience; it's about structural integrity through geometry. When you remove screws, you must replace their clamping force with interlocking tabs and friction-fit joints. This design philosophy forces a deeper understanding of material science, specifically how PLA behaves under load. The result is a sanctuary for your supplies that feels more like a precision-engineered puzzle than a piece of furniture.
Tools and materials for the digital workshop
To build this unit, your primary investment is time and electricity. Unlike traditional woodworking, the precision is handled by the machine’s stepper motors rather than a steady hand.
- 3D Printer: A standard 250mm cube printer like the Bambu Lab A1 or Bambu Lab X1 works for the 4x4 grid version. Larger 5x5 versions may require extended build plates.
- Filament: PLA is recommended for its rigidity. You will need roughly 3-5 spools depending on the size and number of drawers.
- Design Files: Modular STL files optimized for tool-less assembly.
- Scrap Filament: Keep a few short lengths of 1.75mm filament aside; these act as the "keys" to unlock the modular joints if you need to disassemble the unit.
Engineering the full-extension slide
The heart of this project is the 3D-printed full-extension drawer slide. In industrial settings, these are metal assemblies filled with steel ball bearings. Replicating this in plastic requires a departure from traditional spheres. Instead, this design uses specialized "rollers" with a larger surface area to ensure they don't flatten under the weight of heavy contents.
Standard 3D-printed linear slides often bind when loaded because plastic-on-plastic friction is high. By introducing a "cage" that holds these printed rollers at specific intervals, the weight is distributed evenly across the race. This allows the drawer to slide smoothly even when filled with kilograms of metal hardware. The "full extension" aspect is achieved through a multi-stage telescoping mechanism, ensuring you can reach the very back of the drawer without the unit tipping or the drawer falling out.
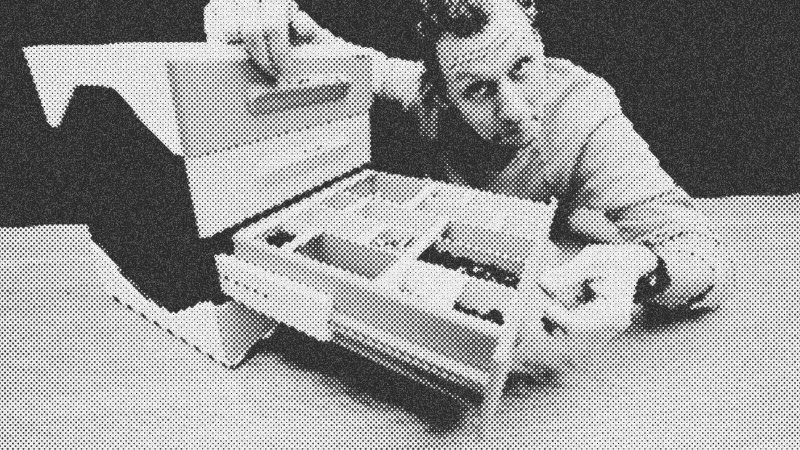
Step-by-step assembly without a screwdriver
- Print the internal rollers and cages: Start with the small, high-precision parts. These must be clean of any stringing to ensure smooth motion.
- Construct the drawer slides: Snap the printed rollers into their cages and slide them into the outer and inner races. Test the motion repeatedly; it should feel effortless.
- Build the frame base: Interlock the four corner pieces. These use flexible locking tabs that click into place. If they feel too tight, a light sanding on the male end of the joint usually solves the tolerance issue.
- Install the side panels: Slide the vertical panels into the base grooves. These provide the lateral stability for the entire cabinet.
- Assemble the drawers: The drawer is a five-part assembly. Click the sides into the front and back panels. The base plate then slides in to lock the geometry together.
- The final lock: Place the top grid onto the corner posts. This final piece acts as a keystone, locking the entire vertical structure into a rigid unit.
Troubleshooting tolerances and weight distribution
3D printing is rarely a one-size-fits-all endeavor. Every printer has slightly different calibration settings, which can lead to parts being too loose or too tight. If your locking tabs won't click, don't force them. Instead, adjust the scale of the "male" part by 1% in your slicer. Conversely, if the slides feel gritty, check for "elephant's foot" on the bottom layer of your prints, which can narrow the tracks and cause binding.
Weight is the ultimate test of a plastic structure. While this cabinet can support over 15 kilograms, it is essential to load the bottom drawers first. Because the drawers are full-extension, pulling out a top drawer filled with heavy bolts could lead to a tip-over if the base isn't properly weighted. The design accounts for this by allowing the units to stack, creating a broader, more stable footprint as the system grows.
Reclaiming the workspace sanctuary
The final product is more than a storage bin; it’s a proof of concept for the future of decentralized manufacturing. When compared to the IKEA Alex, which costs significantly more and offers less usable depth, the 3D-printed alternative provides a tailored solution for the same price or less. You end up with a modular, repairable, and entirely custom sanctuary for your tools, all built from a few rolls of plastic and a bit of ingenuity.
- PLA
- 20%· products
- Bambu Lab
- 10%· companies
- Bambu Lab A1
- 10%· products
- Bambu Lab X1
- 10%· products
- Chappel
- 10%· people
- Other topics
- 40%
No Screws, No Glue, No Tools
WatchAlexandre Chappel // 31:42

I'm an Industrial designer and a maker - I make videos about my projects.